Bot Control Center can be hosted on Microsoft Windows with either of the following services:
-
- Windows Service
- Internet Information Services (IIS)
Additionally, BCC comes bundled with the following applications:
-
- RDP Maintainer
- Slowdown Service
The RDP Maintainer can be run as Windows or IIS service on the same machine that is hosting BCC. It keeps the logged in, graphical sessions open on all registered machines, ensuring scenarios that require an open GUI session execute without errors.
The Slowndown Service is an optional, experimental feature that can be utilized, if a scenario puts too much strain on an external application.
1. Requirements
Hardware
Memory and CPU requirements depend on the number of robots connected to the Bot Control Center and the number of users using the management panel.
Minimal
-
-
- Operating system: Windows Server 2016, Windows 10
- Processor: Dual-core with Hyper-Threading support
- Memory: 8 GB RAM
-
Recommended
-
-
- Windows Server 2019 or later
- Processor: Quad Core or better
- Memory: 16 GB RAM or more
-
Software
Depending on hosting method - as a Windows Service, or under the control of IIS and whether you are installing RDP Maintainer, different .Net software components will be required.
RDP Maintainer
-
-
- .NET Desktop Runtime 8.x
-
Windows Service
-
-
- .NET Runtime 8.x
-
IIS (Internet Information Services)
-
-
- ASP .NET Core Hosting Bundle 8.x (Find out more about installing the Hosting Bundle for IIS here https://learn.microsoft.com/en-us/aspnet/core/host-and-deploy/iis/hosting-bundle?view=aspnetcore-8.0)
-
All .Net 8.x software can be downloaded from https://dotnet.microsoft.com/en-us/download/dotnet/8.0
Database
-
-
- Microsoft SQL Server version 2012 or later (recommended)
- PostgreSQL version 9.6 or later
- MySQL version 5.7 or later
- Oracle DB version 11.2 or later
- SQLite version 3.7 or later
-
Web browser
-
-
- Google Chrome 80 or later
- Firefox 72 or later
- Opera 66 or later
- Microsoft Edge 79 or later
- Safari 13 or later
-
Note: JavaScript must be enabled
2. Bot Control Center
2.1 Initial configuration and quick start
Before you start, make sure that the latest version of .Net 8 is installed, you have access to the selected database engine, and there is a user on the database server with a login, password and appropriate permissions.
The user should have permissions to connect to the server, edit tables and/or databases, and create new databases (if the target database has not already been created).
The server may also have to be configured to accept SQL authentication in addition to Windows one.
Quick Start
In order to configure BCC and launch it from the command line you'll need to:
1. Extract BCC software files to a selected location on your hard drive
2. In a text editor, open a configuration file called appsettings.json
3. Complete the required fields (Sql, GuiControlsDb, JwtToken, AdminAccess, see the Required Fields section below for more information)
4. Save your changes to the appsettings.json file
5. Start the BCC web app by running bcc.exe
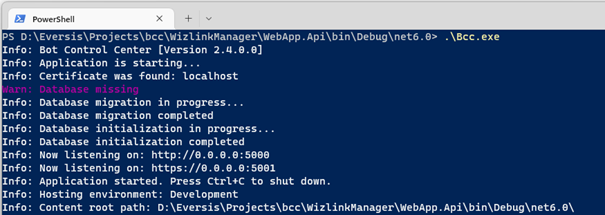
6. Log in to the management panel by entering http://localhost:5000/ in your web browser.
Required fields
Complete the initial BCC configuration by filling out the required fields of the appsettings.json file.
Sql and GuiControlsDb
Complete the ProviderName and ConnectionString fields for both Sql (main BCC database) and GuiControlsDb (supporting database for GUI controls). The available provider names are: mssql, mysql, npgsql (PostgreSQL), oracle and sqlite
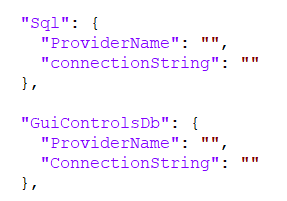
Note: When launching BCC in the command line without a proper certificate, depending on your database engine you may need to force a trusted connection for BCC to run.
Sample ConnectionString for Microsoft SQL Server:

If the database doesn't already exist it will be created, as long as the user has all the required permissions.
JwtToken
Replace the Key sections for User, Designer, Agent and Robot respectively with a unique GUID string. They can be generated in Power Shell with the command
[guid]::NewGuid()
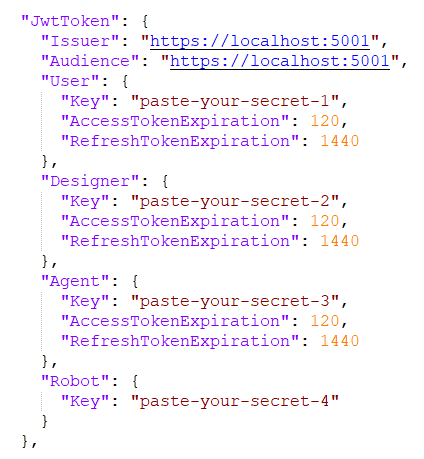
The JwtToken section is responsible for a secure connection between BCC and other Wizlink applications as well as for users logging in to BCC panel.
AccessTokenExpiration should be left as default.
Modify the RefreshTokenExpiration value to change maximum time between user/application logins before user/application needs to log in to BCC again, By default it's either 24h or 30 days (1440 and 43200 minutes respectively).
Robot registration does not expire.
Default values for Issuer and Audience can be left as-is while launching BCC from the command line. It is encouraged to change them to BCC's proper address when hosting them as service.
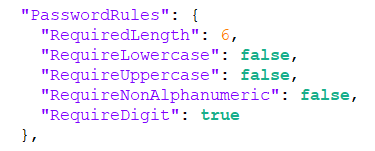
AdminAccess and PasswordRules
Fill out all the AdminAccess fields to create administrator login, which will be used to access the BCC panel.
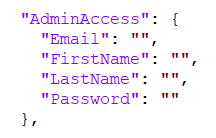
Password needs to meet the requirements set out in PasswordRules section, by default it has to be a minimum of 6 characters long and contain at least one digit.
Additional configuration
In addition to required fields the following can also be configured.
HttpServer, AllowedHosts and AllowedOrigins
HttpServer section determines the web address to open to access the BCC control panel.
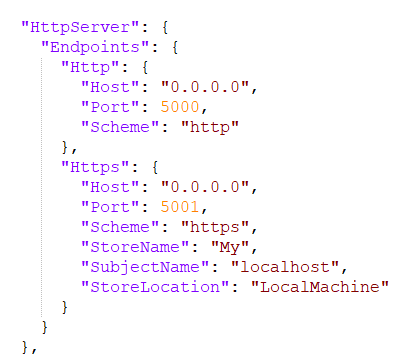
The Http endpoint determines the web address for a test command line launch.
The Https endpoint will be used by Windows Service's Kestrel server, but will be ignored if BCC is hosted with IIS.

AllowedHosts and AllowedOrigins can usually be left as-is, the value can be changed in case local network settings interfere with BCC access.
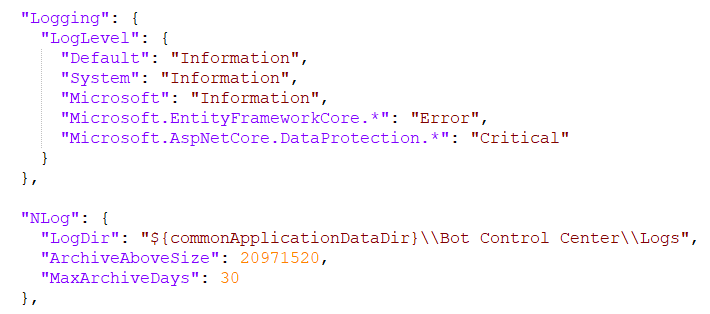
Logging and NLog
Logging and NLog sections determine logging level for internal BCC libraries as well as location, amount of data kept and maximum size of local directory where the logs will be stored.
 \
\
See https://learn.microsoft.com/en-us/dotnet/api/microsoft.extensions.logging.loglevel?view=net-8.0 for more information on logging levels.
TokenCleanupJob
TokenCleanupJob determines time when BCC clears its token data, by default the task runs at 1am.

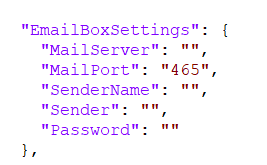
EmailBoxSettings
The email address that will be used for BCC can be configured on startup as well as later on in main BCC panel using the EmailBoxSettings section.
2.2 Windows Service
Service installation
1. Copy Bot Control Center files to a path of your choice (e.g. C:\BotControlCenter)
2. Launch PowerShell as administrator with the location set to the folder with the Bot Control Center files
3. Execute the following Power Shell command - the command will create a Windows Service
New-Service -Name BCC -BinaryPathName "C:\BotControlCenter\BCC.exe" -DisplayName "Bot Control Center" -StartupType Automatic -Description "Wizlink Bot Control Center"
Command documentation for PowerShell 7.2:
Starting the service
Run the Power Shell command - the command will start the Windows service:
Start-Service BCC
You can now log in to Bot Control Center by entering the address http://localhost:5000/ in your web browser.
Removing the service
To remove the created service, first stop it using the Power Shell command
Stop-Service -Name "BCC"
And then remove it using the command
Remove-Service -Name "BCC"
2.3 Internet Information Services (IIS)
IIS installation
Installation of Internet Information Services (IIS) for Windows Server 2012 R2: https://docs.microsoft.com/en-gb/iis/install/installing-iis-85/installing-iis-85-on-windows-server-2012-r2
Enabling the WebSocket protocol is required:
https://learn.microsoft.com/en-us/iis/configuration/system.webserver/websocket
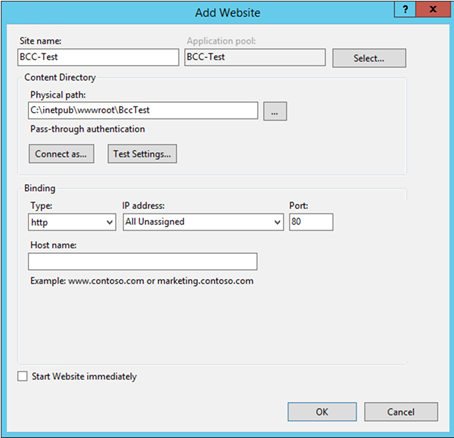
1. Select the server name.
2. Select Add Website from the Sites context menu
3. Enter a name for the Bot Control Center service
4. Select the appropriate application pool or leave the default one
5. Select the location of the Bot Control Center files
6. In the Binding section , select the appropriate IP address, port and Type
7. For the HTTPS type, you must select an SSL certificate
8. Confirm
App Pools settings
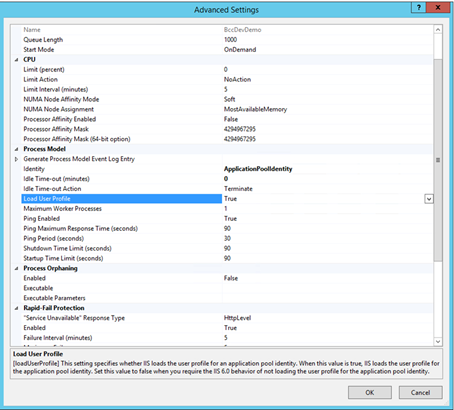
User profile loading must be enabled for the application pool to which the Bot Control Center service is assigned. This is necessary when we use the system's Credential Center to store logins and passwords.
To enable user profile loading for the application pool, select Advanced Settings from the context menu. In the Process Model group, set the Load User Profile setting to True .
To make changes, confirm with the OK button and restart the application pool.
Certificate setup
Manually adding a certificate file
1. Start Internet Information Service (IIS) Manager (inetmgr)
2. Select the name of the server on which you want Bot Control Center to run
3. Select the Server Certificates item available in the IIS group
4. Specify the certificate location and password
After completing the steps, the certificate should be available in the Bindings section for the selected service.
2. RDP Maintainer
2.1 Initial configuration and quick start
The RDP Maintainer service, just like BCC, can be quickly configured and launched from the command line, however in a production environment we recommend setting it up either as a Windows Service or under IIS control.
RDP Maintainer files are part of the BBC package files and can be found in the folder rdp-maintainer.
Quick Start
In order to configure the RDP Maintainer service:
1. Extract RDP Maintainer files to a selected location on your hard drive
2. In a text editor, open a configuration file called appsettings.json
3. Fill out the Url field in th Kestrel section with new IP and port
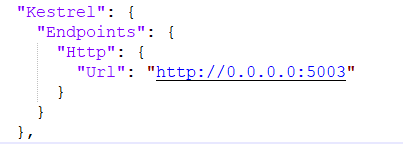
4. Save your changes to the appsettings.json file
5. Start the RDP Maintainer service by running RdpMaintainer.exe
2.2 Windows Service
To install RDP Maintainer as a Windows Service follow the same steps as for BCC.
Service installation
1. Copy RDP Maintainer files to a path of your choice (e.g. C:\RDP Maintainer)
2. Launch PowerShell as administrator with the location set to the folder with the RDP Maintainer files
3. Execute the following Power Shell command - the command will create a Windows Service
New-Service -Name RDP -BinaryPathName "C:\RDP Maintainer\RdpMaintainer.exe" -DisplayName "RDP Maintainer" -StartupType Automatic -Description "Maintains remote desktop sessions for registered machines"
Command documentation for PowerShell 7.2:
Starting the service
Run the Power Shell command - the command will start the Windows service:
Start-Service RDP
The service will now listen on (default IP and port) http://localhost:5003/.
Removing the service
To remove the created service, first stop it using the Power Shell command
Stop-Service -Name "RDP"
And then remove it using the command
Remove-Service -Name "RDP"
Last updated: January 9, 2025